All posts by cdstealer

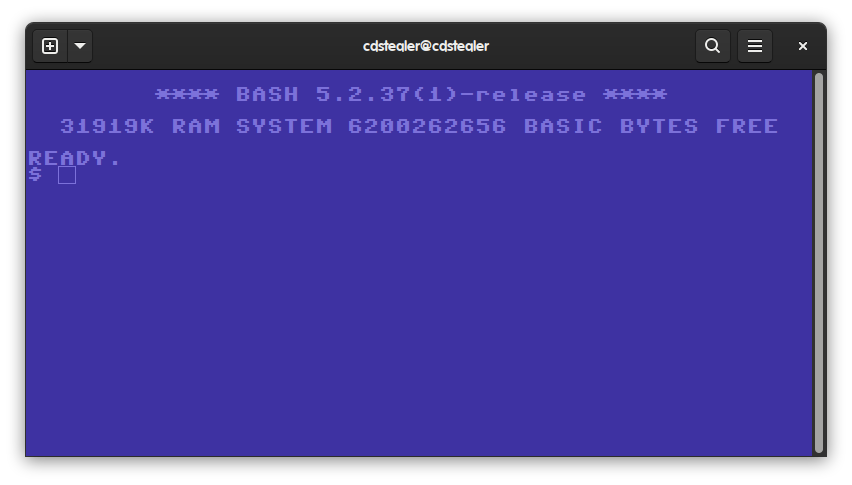
C64 Gnome Terminal

Create the file .bash_c64 in your home directory and populate with the following:

#!/usr/bin/env bash
export PS1=$
row=0
mem=$(grep MemTotal /proc/meminfo | awk '{print $2}')
mem=$((${mem}/1024))
free=$(( $(vmstat | sed '1,2d' | awk '{print $4}') * 4096 * 2))
text=("" "**** BASH $BASH_VERSION ****" "" "${mem}K RAM SYSTEM ${free} BASIC BYTES FREE" "")
clear
for f in "${text[@]}"; do
  columns=$(( ($(tput cols) - ${#f}) / 2))
  tput cup $(( row++ )) ${columns}
  echo "${f}"
done
echo "READY."

Now we'll source the file whenever a new terminal is opened. Open .bashrc and at the bottom enter the following:

source ~/.bash_c64

Next we'll install the c64 font. Download the file below and unpack to /home/<user>/.local/share/fonts

Now open the terminal preferences and create a new profile and configure the basic settings. I've chosen 49 chars wide purely for aesthetics but this will differ depending on your resources. The text will be centred regardless.

Now to define the colours. I set the defaults to the following values:

Text: #7c71da
Background: #3e32a2

Set the profile to be the default (optional) and close.
You'll need to close and reopen terminal and you should be presented with a c64esk termnial.

2 UPS 1 Server

So I found myself in a situation where I had to run 2 UPS's due to larger plugs not being able to fit if the adjacent socket was occupied. Obviously having 2 UPS's with the ability to control the server is a bad idea and typically the driver only accounts for one UPS at any one time.

This takes about 5-10 mins to setup and seems to work as expected.
Both UPS's are APC, a 1050VA and a 700ES. Both are connected to the server via USB. The driver is apcupsd.

Make sure both UPS's are powered on and connected via USB.
Make a note of the Bus / Device.

# lsusb
...
Bus 001 Device 004: ID 051d:0002 American Power Conversion Uninterruptible Power Supply
Bus 001 Device 005: ID 051d:0002 American Power Conversion Uninterruptible Power Supply
...

Let's make sure udev sees them.

# udevadm info --attribute-walk --name=/dev/bus/usb/001/004 | egrep 'manufacturer|product|serial'
ATTR{manufacturer}=="APC"
ATTR{product}=="Back-UPS ES 700G FW:871.O3 .I USB FW:O3 "
ATTR{serial}=="#########1 "
ATTRS{manufacturer}=="Linux 6.12.17-gentoo xhci-hcd"
ATTRS{product}=="xHCI Host Controller"
ATTRS{serial}=="0000:00:14.0"
# udevadm info --attribute-walk --name=/dev/bus/usb/001/005 | egrep 'manufacturer|product|serial'
ATTR{manufacturer}=="American Power Conversion"
ATTR{product}=="Back-UPS BE1050G2 FW:497200G -497300G "
ATTR{serial}=="##########2"
ATTRS{manufacturer}=="Linux 6.12.17-gentoo xhci-hcd"
ATTRS{product}=="xHCI Host Controller"
ATTRS{serial}=="0000:00:14.0"

Let's create a rule.

# vim /etc/udev/rules.d/ups.rules

# Main UPS
SUBSYSTEM=="usb", ATTR{manufacturer}=="American Power Conversion", ATTR{serial}=="########1 ", OWNER="root", SYMLINK+="ups-server"
# Secondary UPS
SUBSYSTEM=="usb", ATTR{manufacturer}=="APC", ATTR{serial}=="#######2", OWNER="root", SYMLINK+="ups-devices"

Note: The older of the 2 had spaces at the end of the serial number, so I kept them'

Reload Udev

# udevadm control --reload

Now let's check them udev rules.

# udevadm trigger -v -attr-match=serial="########1  "
# udevadm trigger -v -attr-match=serial="########2"
# ls -l /dev

You should see:

/dev/ups-devices -> bus/usb/001/004
/dev/ups-server -> bus/usb/001/005

Install the driver.

# emerge -av apcupsd
# systemctl stop apcupsd
# systemctl disable apcupsd
# cd /etc/apcupsd/
# mkdir apcupsd-devices
# mkdir apcupsd-server
# cp apcupsd.conf apcupsd-devices.conf apcupsd-server.conf

Modify as required:

apcupsd-server.conf

UPSNAME 1050VA
UPSCABLE usb
UPSTYPE usb /dev/ups-server
DEVICE
POLLTIME 60
LOCKFILE /run/apcupsd/
SCRIPTDIR /etc/apcupsd/apcupsd-server
PWRFAILDIR /etc/apcupsd/apcupsd-server
NOLOGINDIR /etc
ONBATTERYDELAY 6
BATTERYLEVEL 5
MINUTES 3
TIMEOUT 0
ANNOY 300
ANNOYDELAY 60
NOLOGON disable
KILLDELAY 0
NETSERVER on
NISIP 127.0.0.1
NISPORT 3551
EVENTSFILE /var/log/apcupsd-server.events
EVENTSFILEMAX 10
UPSCLASS standalone
UPSMODE disable
STATTIME 0
STATFILE /var/log/apcupsd-server.status
LOGSTATS off
DATATIME 0
apcupsd-devices.conf

UPSNAME 700ES
UPSCABLE usb
UPSTYPE usb /dev/ups-devices
POLLTIME 60
SCRIPTDIR /etc/apcupsd/apcupsd-devices
PWRFAILDIR /etc/apcupsd/apcupsd-devices
ONBATTERYDELAY 6
BATTERYLEVEL -1
MINUTES -1
TIMEOUT 0
ANNOY 0
ANNOYDELAY 0
NOLOGON disable
KILLDELAY 0
NETSERVER on
NISIP 127.0.0.1
NISPORT 3552
EVENTSFILE /var/log/apcupsd-devices.events
EVENTSFILEMAX 10
UPSCLASS standalone
UPSMODE disable
STATTIME 0
STATFILE /var/log/apcupsd-devices.status
LOGSTATS off
DATATIME 0

There needs to be 2 versions of the daemon running on different ports. The devices config does not allow for server control.

Copy the following scripts into the script directory specified in the configs.

apccontrol
changeme
commfailure
commok
offbattery
onbattery
safe.apccontrol

Startup Daemon (systemd)

Copy the systemd unit file for each daemon.

# cp /usr/lib/systemd/system/apcupsd.service /usr/lib/systemd/system/apcupsd-server.service

# cp /usr/lib/systemd/system/apcupsd.service /usr/lib/systemd/system/apcupsd-devices.service

Adjust each unit file accordingly:

[Service]
ExecStart=/sbin/apcupsd -b -f /etc/apcupsd/apcupsd-server.conf -P /run/apcupsd/apcupsd-server.pid
[Service]
ExecStart=/sbin/apcupsd -b -f /etc/apcupsd/apcupsd-devices.conf -P /run/apcupsd/apcupsd-devices.pid

Enable and start the services.

# systemctl --now enable apcupsd-server
# systemctl --now enable apcupsd-devices

If all went to plan, you should now see both daemons running.

# systemctl status apcupsd-server
● apcupsd-server.service - APC UPS Monitor
Loaded: loaded (/usr/lib/systemd/system/apcupsd-server.service; enabled; preset: disabled)
Active: active (running) since Sun 2025-03-09 20:58:55 GMT; 23h ago
Invocation: bea2f2a029de4384ba3b9fdb62dccc27
Main PID: 18929 (apcupsd)
Tasks: 3 (limit: 38270)
Memory: 2M (peak: 6.6M)
CPU: 2.669s
CGroup: /system.slice/apcupsd-server.service
└─18929 /sbin/apcupsd -b -f /etc/apcupsd/apcupsd-server.conf -P /run/apcupsd/apcupsd-server.pid
Mar 09 20:58:55 hostname systemd[1]: Started APC UPS Monitor.
Mar 09 20:58:55 hostname apcupsd[18929]: apcupsd 3.14.14 (31 May 2016) gentoo startup succeeded
Mar 09 20:58:55 hostname apcupsd[18929]: NIS server startup succeeded
Mar 09 21:02:13 hostname apcupsd[18929]: Communications with UPS restored.
# systemctl status apcupsd-devices
● apcupsd-devices.service - APC UPS Monitor
Loaded: loaded (/usr/lib/systemd/system/apcupsd-devices.service; enabled; preset: disabled)
Active: active (running) since Sun 2025-03-09 20:58:48 GMT; 23h ago
Invocation: 6079648a84d74eda9d48aa43e31aaf14
Main PID: 18820 (apcupsd)
Tasks: 3 (limit: 38270)
Memory: 408K (peak: 4.8M)
CPU: 2.662s
CGroup: /system.slice/apcupsd-devices.service
└─18820 /sbin/apcupsd -b -f /etc/apcupsd/apcupsd-devices.conf -P /run/apcupsd/apcupsd-devices.pid
Mar 09 20:58:48 hostname systemd[1]: Started APC UPS Monitor.
Mar 09 20:58:48 hostname apcupsd[18820]: apcupsd 3.14.14 (31 May 2016) gentoo startup succeeded
Mar 09 20:58:48 hostname apcupsd[18820]: NIS server startup succeeded
Mar 09 21:02:13 hostname apcupsd[18820]: Communications with UPS restored.

With this setup, I get an email should there be any interruption on either UPS or when the battery requires replacing.

Go on, give them a test and cut the power ;)

GitWeb

Emerge git with the required USE flags:

emerge -aq dev-vcs/git curl gpg iconv nls pcre perl safe-directory webdav cgi cvs highlight keyring tk

Configure Apache vhosts (NO AUTH):

<VirtualHost *:443>
	  SSLEngine on
        <FilesMatch "\.(cgi|shtml|phtml|php)$">
          SSLOptions +StdEnvVars
        </FilesMatch>
        <Directory "/var/www/localhost/cgi-bin">
          SSLOptions +StdEnvVars
        </Directory>
          SSLCertificateFile /path/to/cert.crt
          SSLCertificateKeyFile /path/to/key.key
          ServerName git.example.com
          DocumentRoot /usr/share/gitweb
	  Options ExecCGI FollowSymLinks SymLinksIfOwnerMatch
	<Location />
	  SSLRequireSSL
	  Require all allowed
          RewriteOptions inherit
          AllowOverride All
	</Location>
        <Directory /usr/share/gitweb>
          Require all granted
          RewriteOptions inherit
          AllowOverride All
          Options ExecCGI FollowSymLinks SymLinksIfOwnerMatch
          <Files gitweb.cgi>
            SetHandler cgi-script
          </Files>
        </Directory>
	  DirectoryIndex gitweb.cgi
          SetEnv  GITWEB_CONFIG  /etc/gitweb.conf
        <IfModule headers_module>
          RequestHeader set X-HTTPS 1
        </IfModule>
</VirtualHost>

Basic /etc/gitweb.conf
$projectroot = '/path/to/gitroot';
@git_base_url_list = ( 'git@example.com', );
$site_name = "Smack my git up!";
$default_projects_order = "age";
$projects_list_group_categories = 1;
$feature{'blame'}{'default'} = [1];
$feature{'highlight'}{'default'} = [1];

Adjust git-daemon
Gitweb allows browsing repositories via HTTP, but if you will be pulling from your repositories using the git:// protocol, you'll also want to run git-daemon. On Gentoo, this is really easy, just edit /etc/conf.d/git-daemon as you see fit. eg:

GITDAEMON_OPTS="--syslog --enable=receive-pack --export-all"

This exports all repositories within the git root. It also allows pushing file to the server.

You will also need to ensure that any clients to connect to port tcp/9418 (default)

Setup the git user

useradd -m git -d /path/to/githome -s /usr/bin/git-shell
mkdir /path/to/githome/.ssh
cat /home/A_USER/.ssh/id_rsa.pub > /path/to/githome/.ssh/authorized_keys
chmod 700 /path/to/githome/.ssh
chmod 600 /path/to/githome/.ssh/authorized_keys
setfacl -PRdm u:apache:rwx /path/to/githome

Create an Empty Repository

su -s /bin/bash git
cd
mkdir name.git
cd name.git
git init --bare
echo "This is a test" > description
git remote add origin git@example.com:name.git

Set Configuration Options

Execute the following on a client (optional)
To see available options execute: git help --config

git config --global init.defaultBranch master
git config --global core.editor vim
git config --global alias.st status
git config --global alias.co checkout
git config --global alias.br branch
git config --global alias.up rebase
git config --global alias.ci commit
git config --global user.name "A_USER"
git config --global user.email A_USER@example.com
git config --global color.ui true
git config --global --add --bool push.autoSetupRemote true

Clone Repo

cd to local git
git clone git@example.com:name.git
cd name
touch README.md
git add README.md
git ci -m "Initial Setup"
git push
git br branch_name
git co branch_name
mkdir testdir
touch testdir/testfile
git add .
git ci -m "init"
git push # Pushes to your upstream branch
git push origin branch_name:master # Pushes to the master branch

Web Authentication

Note: I did not have any success using dbmmanage. Use htdbm instead.

Create the database file and add a user:
Do not store this in the root of web eg: /var/www/locahost/htdocs, but make sure apache can get to the file.

htdbm -cm -TGDBM <path/to/dbm_file> <user>

-c - create db
-m - use MD5 hashing
-T - set the format of the db file

Set the permission for apache:

chown apache: <path/to/dbm_file>
chmod 640 <path/to/dbm_file>

Add code to vhosts:
You can apply this to files, directories etc. Here I've done it for the whole subdomain. Replace the 3 highlighted italic lines above with the code below, excluding the start/end tags.

    <Location />
      AuthName "Private"
      AuthType Basic
      AuthBasicProvider dbm
      AuthDBMType GDBM
      AuthDBMUserFile "/path/to/dbm_file"
      Require valid-user 
      Require all denied
      RewriteOptions inherit
      AllowOverride All
    </Location>

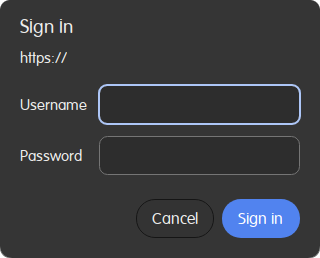
Reload apache and browse to protected area and you should be prompted to authenticate.

A good explanation can be found here for the web config.

Security Oneliners

Check encryption of network protocols

SSH

nmap --script ssh2-enum-algos -p 22 example.com

Which will output something like:

PORT   STATE SERVICE
22/tcp open ssh
| ssh2-enum-algos:
| kex_algorithms: (7)
| curve25519-sha256
| curve25519-sha256@libssh.org
| diffie-hellman-group18-sha512
| diffie-hellman-group16-sha512
| diffie-hellman-group-exchange-sha256
| ext-info-s
| kex-strict-s-v00@openssh.com
| server_host_key_algorithms: (4)
| rsa-sha2-512
| rsa-sha2-256
| ecdsa-sha2-nistp256
| ssh-ed25519
| encryption_algorithms: (6)
| chacha20-poly1305@openssh.com
| aes256-gcm@openssh.com
| aes128-gcm@openssh.com
| aes256-ctr
| aes192-ctr
| aes128-ctr
| mac_algorithms: (3)
| hmac-sha2-256-etm@openssh.com
| hmac-sha2-512-etm@openssh.com
| umac-128-etm@openssh.com
| compression_algorithms: (2)
| none
|_ zlib@openssh.com

Nmap done: 1 IP address (1 host up) scanned in 0.09 seconds

WEB/FTP/MTA

nmap --script ssl-enum-ciphers -p 443 example.com
PORT    STATE SERVICE
443/tcp open https
| ssl-enum-ciphers:
| TLSv1.2:
| ciphers:
| TLS_DHE_RSA_WITH_AES_128_CBC_SHA (dh 2048) - A
| TLS_DHE_RSA_WITH_AES_128_CBC_SHA256 (dh 2048) - A
| TLS_DHE_RSA_WITH_AES_128_CCM (dh 2048) - A
| TLS_DHE_RSA_WITH_AES_128_CCM_8 (dh 2048) - A
| TLS_DHE_RSA_WITH_AES_128_GCM_SHA256 (dh 2048) - A
| TLS_DHE_RSA_WITH_AES_256_CBC_SHA (dh 2048) - A
| TLS_DHE_RSA_WITH_AES_256_CBC_SHA256 (dh 2048) - A
| TLS_DHE_RSA_WITH_AES_256_CCM (dh 2048) - A
| TLS_DHE_RSA_WITH_AES_256_CCM_8 (dh 2048) - A
| TLS_DHE_RSA_WITH_AES_256_GCM_SHA384 (dh 2048) - A
| TLS_DHE_RSA_WITH_ARIA_128_GCM_SHA256 (dh 2048) - A
| TLS_DHE_RSA_WITH_ARIA_256_GCM_SHA384 (dh 2048) - A
| TLS_DHE_RSA_WITH_CAMELLIA_128_CBC_SHA (dh 2048) - A
| TLS_DHE_RSA_WITH_CAMELLIA_128_CBC_SHA256 (dh 2048) - A
| TLS_DHE_RSA_WITH_CAMELLIA_256_CBC_SHA (dh 2048) - A
| TLS_DHE_RSA_WITH_CAMELLIA_256_CBC_SHA256 (dh 2048) - A
| TLS_DHE_RSA_WITH_CHACHA20_POLY1305_SHA256 (dh 2048) - A
| TLS_ECDHE_RSA_WITH_AES_128_CBC_SHA (secp256r1) - A
| TLS_ECDHE_RSA_WITH_AES_128_CBC_SHA256 (secp256r1) - A
| TLS_ECDHE_RSA_WITH_AES_128_GCM_SHA256 (secp256r1) - A
| TLS_ECDHE_RSA_WITH_AES_256_CBC_SHA (secp256r1) - A
| TLS_ECDHE_RSA_WITH_AES_256_CBC_SHA384 (secp256r1) - A
| TLS_ECDHE_RSA_WITH_AES_256_GCM_SHA384 (secp256r1) - A
| TLS_ECDHE_RSA_WITH_ARIA_128_GCM_SHA256 (secp256r1) - A
| TLS_ECDHE_RSA_WITH_ARIA_256_GCM_SHA384 (secp256r1) - A
| TLS_ECDHE_RSA_WITH_CAMELLIA_128_CBC_SHA256 (secp256r1) - A
| TLS_ECDHE_RSA_WITH_CAMELLIA_256_CBC_SHA384 (secp256r1) - A
| TLS_ECDHE_RSA_WITH_CHACHA20_POLY1305_SHA256 (secp256r1) - A
| TLS_RSA_WITH_AES_128_CBC_SHA256 (rsa 2048) - A
| TLS_RSA_WITH_AES_128_CCM (rsa 2048) - A
| TLS_RSA_WITH_AES_128_CCM_8 (rsa 2048) - A
| TLS_RSA_WITH_AES_128_GCM_SHA256 (rsa 2048) - A
| TLS_RSA_WITH_AES_256_CBC_SHA256 (rsa 2048) - A
| TLS_RSA_WITH_AES_256_CCM (rsa 2048) - A
| TLS_RSA_WITH_AES_256_CCM_8 (rsa 2048) - A
| TLS_RSA_WITH_AES_256_GCM_SHA384 (rsa 2048) - A
| TLS_RSA_WITH_ARIA_128_GCM_SHA256 (rsa 2048) - A
| TLS_RSA_WITH_ARIA_256_GCM_SHA384 (rsa 2048) - A
| TLS_RSA_WITH_CAMELLIA_128_CBC_SHA (rsa 2048) - A
| TLS_RSA_WITH_CAMELLIA_128_CBC_SHA256 (rsa 2048) - A
| TLS_RSA_WITH_CAMELLIA_256_CBC_SHA (rsa 2048) - A
| TLS_RSA_WITH_CAMELLIA_256_CBC_SHA256 (rsa 2048) - A
| compressors:
| NULL
| cipher preference: client
| TLSv1.3:
| ciphers:
| TLS_AKE_WITH_AES_128_GCM_SHA256 (ecdh_x25519) - A
| TLS_AKE_WITH_AES_256_GCM_SHA384 (ecdh_x25519) - A
| TLS_AKE_WITH_CHACHA20_POLY1305_SHA256 (ecdh_x25519) - A
| cipher preference: client
|_ least strength: A

Nmap done: 1 IP address (1 host up) scanned in 0.26 seconds

Awk One Liners

Consider the output of "uptime"

$ uptime
11:19:07 up 7 days, 23:46, 1 user, load average: 0.12, 0.41, 0.34

You could use, cut, grep etc etc to pull out the 5 minute average value.

$ uptime | awk -F' ' '{print substr($10, 1, length($10)-1)}'
0.12

This takes the value of the 10th field starting at the 1st character, then take the length of field 10 and removes the last character.

Apache Custom LogFormats

Take the leg work out of reading your apache logs by converting them to a structured format that's easy to read. Enter JSON :)

Create the file /etc/apache2/vhosts.d/00_default_logging.conf
You will also need to ensure the "logio_module" is enabled.

For the access log, I use the format: Apache doc.

LogFormat "{\"time\":\"%{msec}t\", \"bytes_in\":\"%I\", \"bytes_out\":\"%O\", \"cookie\":\"%{Cookie}i\", \"server\":\"%v\", \"dest_port\":\"%p\", \"http_content_type\":\"%{Content-type}i\", \"http_method\":\"%m\", \"http_referrer\":\"%{Referer}i\", \"http_user_agent\":\"%{User-agent}i\", \"ident\":\"%l\", \"response_time_microseconds\":\"%D\", \"client\":\"%h\", \"remoteAddr\":\"%a\", \"status\":\"%>s\", \"uri_path\":\"%U\", \"uri_query\":\"%q\", \"user\":\"%u\"}" apache_json

And for the error log, I use: Apache doc.

ErrorLogFormat "{\"time\":\"%{msec}t\", \"client\":\"%a\", \"log_level\":\"%l\", \"pid\":\"%P\", \"srcln\":\"%F\", \"error_code\":\"%E\", \"message\":\"%M\"}"

In the vhost.conf I have the following at the bottom of my VirtualHost block:

<VirtualHost>
    ...
    CustomLog "/var/log/apache2/ssl_access.log" apache_json
    ErrorLog /var/log/apache2/ssl_error.log
</VirtualHost>

Give the command to test the config is sane:

apachectl configtest

If nothing is returned, go ahead and restart apache.
This also makes importing the logs much easier into tools like ELK or Splunk.

Sed One Liners

-------------------------------------------------------------------------
USEFUL ONE-LINE SCRIPTS FOR SED (Unix stream editor)        Dec. 29, 2005
Compiled by Eric Pement - pemente[at]northpark[dot]edu        version 5.5

Latest version of this file (in English) is usually at: (not updated since)
   http://sed.sourceforge.net/sed1line.txt
   http://www.pement.org/sed/sed1line.txt

FILE SPACING:

 # double space a file
 sed G

 # double space a file which already has blank lines in it. Output file
 # should contain no more than one blank line between lines of text.
 sed '/^$/d;G'

 # triple space a file
 sed 'G;G'

 # undo double-spacing (assumes even-numbered lines are always blank)
 sed 'n;d'

 # insert a blank line above every line which matches "regex"
 sed '/regex/{x;p;x;}'

 # insert a blank line below every line which matches "regex"
 sed '/regex/G'

 # insert a blank line above and below every line which matches "regex"
 sed '/regex/{x;p;x;G;}'

NUMBERING:

 # number each line of a file (simple left alignment). Using a tab (see
 # note on '\t' at end of file) instead of space will preserve margins.
 sed = filename | sed 'N;s/\n/\t/'

 # number each line of a file (number on left, right-aligned)
 sed = filename | sed 'N; s/^/     /; s/ *\(.\{6,\}\)\n/\1  /'

 # number each line of file, but only print numbers if line is not blank
 sed '/./=' filename | sed '/./N; s/\n/ /'

 # count lines (emulates "wc -l")
 sed -n '$='

TEXT CONVERSION AND SUBSTITUTION:

 # IN UNIX ENVIRONMENT: convert DOS newlines (CR/LF) to Unix format.
 sed 's/.$//'               # assumes that all lines end with CR/LF
 sed 's/^M$//'              # in bash/tcsh, press Ctrl-V then Ctrl-M
 sed 's/\x0D$//'            # works on ssed, gsed 3.02.80 or higher

 # IN UNIX ENVIRONMENT: convert Unix newlines (LF) to DOS format.
 sed "s/$/`echo -e \\\r`/"            # command line under ksh
 sed 's/$'"/`echo \\\r`/"             # command line under bash
 sed "s/$/`echo \\\r`/"               # command line under zsh
 sed 's/$/\r/'                        # gsed 3.02.80 or higher

 # IN DOS ENVIRONMENT: convert Unix newlines (LF) to DOS format.
 sed "s/$//"                          # method 1
 sed -n p                             # method 2

 # IN DOS ENVIRONMENT: convert DOS newlines (CR/LF) to Unix format.
 # Can only be done with UnxUtils sed, version 4.0.7 or higher. The
 # UnxUtils version can be identified by the custom "--text" switch
 # which appears when you use the "--help" switch. Otherwise, changing
 # DOS newlines to Unix newlines cannot be done with sed in a DOS
 # environment. Use "tr" instead.
 sed "s/\r//" infile >outfile         # UnxUtils sed v4.0.7 or higher
 tr -d \r <infile >outfile            # GNU tr version 1.22 or higher

 # delete leading whitespace (spaces, tabs) from front of each line
 # aligns all text flush left
 sed 's/^[ \t]*//'                    # see note on '\t' at end of file

 # delete trailing whitespace (spaces, tabs) from end of each line
 sed 's/[ \t]*$//'                    # see note on '\t' at end of file

 # delete BOTH leading and trailing whitespace from each line
 sed 's/^[ \t]*//;s/[ \t]*$//'

 # insert 5 blank spaces at beginning of each line (make page offset)
 sed 's/^/     /'

 # align all text flush right on a 79-column width
 sed -e :a -e 's/^.\{1,78\}$/ &/;ta'  # set at 78 plus 1 space

 # center all text in the middle of 79-column width. In method 1,
 # spaces at the beginning of the line are significant, and trailing
 # spaces are appended at the end of the line. In method 2, spaces at
 # the beginning of the line are discarded in centering the line, and
 # no trailing spaces appear at the end of lines.
 sed  -e :a -e 's/^.\{1,77\}$/ & /;ta'                     # method 1
 sed  -e :a -e 's/^.\{1,77\}$/ &/;ta' -e 's/\( *\)\1/\1/'  # method 2

 # substitute (find and replace) "foo" with "bar" on each line
 sed 's/foo/bar/'             # replaces only 1st instance in a line
 sed 's/foo/bar/4'            # replaces only 4th instance in a line
 sed 's/foo/bar/g'            # replaces ALL instances in a line
 sed 's/\(.*\)foo\(.*foo\)/\1bar\2/' # replace the next-to-last case
 sed 's/\(.*\)foo/\1bar/'            # replace only the last case

 # substitute "foo" with "bar" ONLY for lines which contain "baz"
 sed '/baz/s/foo/bar/g'

 # substitute "foo" with "bar" EXCEPT for lines which contain "baz"
 sed '/baz/!s/foo/bar/g'

 # change "scarlet" or "ruby" or "puce" to "red"
 sed 's/scarlet/red/g;s/ruby/red/g;s/puce/red/g'   # most seds
 gsed 's/scarlet\|ruby\|puce/red/g'                # GNU sed only

 # reverse order of lines (emulates "tac")
 # bug/feature in HHsed v1.5 causes blank lines to be deleted
 sed '1!G;h;$!d'               # method 1
 sed -n '1!G;h;$p'             # method 2

 # reverse each character on the line (emulates "rev")
 sed '/\n/!G;s/\(.\)\(.*\n\)/&\2\1/;//D;s/.//'

 # join pairs of lines side-by-side (like "paste")
 sed '$!N;s/\n/ /'

 # if a line ends with a backslash, append the next line to it
 sed -e :a -e '/\\$/N; s/\\\n//; ta'

 # if a line begins with an equal sign, append it to the previous line
 # and replace the "=" with a single space
 sed -e :a -e '$!N;s/\n=/ /;ta' -e 'P;D'

 # add commas to numeric strings, changing "1234567" to "1,234,567"
 gsed ':a;s/\B[0-9]\{3\}\>/,&/;ta'                     # GNU sed
 sed -e :a -e 's/\(.*[0-9]\)\([0-9]\{3\}\)/\1,\2/;ta'  # other seds

 # add commas to numbers with decimal points and minus signs (GNU sed)
 gsed -r ':a;s/(^|[^0-9.])([0-9]+)([0-9]{3})/\1\2,\3/g;ta'

 # add a blank line every 5 lines (after lines 5, 10, 15, 20, etc.)
 gsed '0~5G'                  # GNU sed only
 sed 'n;n;n;n;G;'             # other seds

SELECTIVE PRINTING OF CERTAIN LINES:

 # print first 10 lines of file (emulates behavior of "head")
 sed 10q

 # print first line of file (emulates "head -1")
 sed q

 # print the last 10 lines of a file (emulates "tail")
 sed -e :a -e '$q;N;11,$D;ba'

 # print the last 2 lines of a file (emulates "tail -2")
 sed '$!N;$!D'

 # print the last line of a file (emulates "tail -1")
 sed '$!d'                    # method 1
 sed -n '$p'                  # method 2

 # print the next-to-the-last line of a file
 sed -e '$!{h;d;}' -e x              # for 1-line files, print blank line
 sed -e '1{$q;}' -e '$!{h;d;}' -e x  # for 1-line files, print the line
 sed -e '1{$d;}' -e '$!{h;d;}' -e x  # for 1-line files, print nothing

 # print only lines which match regular expression (emulates "grep")
 sed -n '/regexp/p'           # method 1
 sed '/regexp/!d'             # method 2

 # print only lines which do NOT match regexp (emulates "grep -v")
 sed -n '/regexp/!p'          # method 1, corresponds to above
 sed '/regexp/d'              # method 2, simpler syntax

 # print the line immediately before a regexp, but not the line
 # containing the regexp
 sed -n '/regexp/{g;1!p;};h'

 # print the line immediately after a regexp, but not the line
 # containing the regexp
 sed -n '/regexp/{n;p;}'

 # print 1 line of context before and after regexp, with line number
 # indicating where the regexp occurred (similar to "grep -A1 -B1")
 sed -n -e '/regexp/{=;x;1!p;g;$!N;p;D;}' -e h

 # grep for AAA and BBB and CCC (in any order)
 sed '/AAA/!d; /BBB/!d; /CCC/!d'

 # grep for AAA and BBB and CCC (in that order)
 sed '/AAA.*BBB.*CCC/!d'

 # grep for AAA or BBB or CCC (emulates "egrep")
 sed -e '/AAA/b' -e '/BBB/b' -e '/CCC/b' -e d    # most seds
 gsed '/AAA\|BBB\|CCC/!d'                        # GNU sed only

 # print paragraph if it contains AAA (blank lines separate paragraphs)
 # HHsed v1.5 must insert a 'G;' after 'x;' in the next 3 scripts below
 sed -e '/./{H;$!d;}' -e 'x;/AAA/!d;'

 # print paragraph if it contains AAA and BBB and CCC (in any order)
 sed -e '/./{H;$!d;}' -e 'x;/AAA/!d;/BBB/!d;/CCC/!d'

 # print paragraph if it contains AAA or BBB or CCC
 sed -e '/./{H;$!d;}' -e 'x;/AAA/b' -e '/BBB/b' -e '/CCC/b' -e d
 gsed '/./{H;$!d;};x;/AAA\|BBB\|CCC/b;d'         # GNU sed only

 # print only lines of 65 characters or longer
 sed -n '/^.\{65\}/p'

 # print only lines of less than 65 characters
 sed -n '/^.\{65\}/!p'        # method 1, corresponds to above
 sed '/^.\{65\}/d'            # method 2, simpler syntax

 # print section of file from regular expression to end of file
 sed -n '/regexp/,$p'

 # print section of file based on line numbers (lines 8-12, inclusive)
 sed -n '8,12p'               # method 1
 sed '8,12!d'                 # method 2

 # print line number 52
 sed -n '52p'                 # method 1
 sed '52!d'                   # method 2
 sed '52q;d'                  # method 3, efficient on large files

 # beginning at line 3, print every 7th line
 gsed -n '3~7p'               # GNU sed only
 sed -n '3,${p;n;n;n;n;n;n;}' # other seds

 # print section of file between two regular expressions (inclusive)
 sed -n '/Iowa/,/Montana/p'             # case sensitive

SELECTIVE DELETION OF CERTAIN LINES:

 # print all of file EXCEPT section between 2 regular expressions
 sed '/Iowa/,/Montana/d'

 # delete duplicate, consecutive lines from a file (emulates "uniq").
 # First line in a set of duplicate lines is kept, rest are deleted.
 sed '$!N; /^\(.*\)\n\1$/!P; D'

 # delete duplicate, nonconsecutive lines from a file. Beware not to
 # overflow the buffer size of the hold space, or else use GNU sed.
 sed -n 'G; s/\n/&&/; /^\([ -~]*\n\).*\n\1/d; s/\n//; h; P'

 # delete all lines except duplicate lines (emulates "uniq -d").
 sed '$!N; s/^\(.*\)\n\1$/\1/; t; D'

 # delete the first 10 lines of a file
 sed '1,10d'

 # delete the last line of a file
 sed '$d'

 # delete the last 2 lines of a file
 sed 'N;$!P;$!D;$d'

 # delete the last 10 lines of a file
 sed -e :a -e '$d;N;2,10ba' -e 'P;D'   # method 1
 sed -n -e :a -e '1,10!{P;N;D;};N;ba'  # method 2

 # delete every 8th line
 gsed '0~8d'                           # GNU sed only
 sed 'n;n;n;n;n;n;n;d;'                # other seds

 # delete lines matching pattern
 sed '/pattern/d'

 # delete ALL blank lines from a file (same as "grep '.' ")
 sed '/^$/d'                           # method 1
 sed '/./!d'                           # method 2

 # delete all CONSECUTIVE blank lines from file except the first; also
 # deletes all blank lines from top and end of file (emulates "cat -s")
 sed '/./,/^$/!d'          # method 1, allows 0 blanks at top, 1 at EOF
 sed '/^$/N;/\n$/D'        # method 2, allows 1 blank at top, 0 at EOF

 # delete all CONSECUTIVE blank lines from file except the first 2:
 sed '/^$/N;/\n$/N;//D'

 # delete all leading blank lines at top of file
 sed '/./,$!d'

 # delete all trailing blank lines at end of file
 sed -e :a -e '/^\n*$/{$d;N;ba' -e '}'  # works on all seds
 sed -e :a -e '/^\n*$/N;/\n$/ba'        # ditto, except for gsed 3.02.*

 # delete the last line of each paragraph
 sed -n '/^$/{p;h;};/./{x;/./p;}'

SPECIAL APPLICATIONS:

 # remove nroff overstrikes (char, backspace) from man pages. The 'echo'
 # command may need an -e switch if you use Unix System V or bash shell.
 sed "s/.`echo \\\b`//g"    # double quotes required for Unix environment
 sed 's/.^H//g'             # in bash/tcsh, press Ctrl-V and then Ctrl-H
 sed 's/.\x08//g'           # hex expression for sed 1.5, GNU sed, ssed

 # get Usenet/e-mail message header
 sed '/^$/q'                # deletes everything after first blank line

 # get Usenet/e-mail message body
 sed '1,/^$/d'              # deletes everything up to first blank line

 # get Subject header, but remove initial "Subject: " portion
 sed '/^Subject: */!d; s///;q'

 # get return address header
 sed '/^Reply-To:/q; /^From:/h; /./d;g;q'

 # parse out the address proper. Pulls out the e-mail address by itself
 # from the 1-line return address header (see preceding script)
 sed 's/ *(.*)//; s/>.*//; s/.*[:<] *//'

 # add a leading angle bracket and space to each line (quote a message)
 sed 's/^/> /'

 # delete leading angle bracket & space from each line (unquote a message)
 sed 's/^> //'

 # remove most HTML tags (accommodates multiple-line tags)
 sed -e :a -e 's/<[^>]*>//g;/</N;//ba'

 # extract multi-part uuencoded binaries, removing extraneous header
 # info, so that only the uuencoded portion remains. Files passed to
 # sed must be passed in the proper order. Version 1 can be entered
 # from the command line; version 2 can be made into an executable
 # Unix shell script. (Modified from a script by Rahul Dhesi.)
 sed '/^end/,/^begin/d' file1 file2 ... fileX | uudecode   # vers. 1
 sed '/^end/,/^begin/d' "$@" | uudecode                    # vers. 2

 # sort paragraphs of file alphabetically. Paragraphs are separated by blank
 # lines. GNU sed uses \v for vertical tab, or any unique char will do.
 sed '/./{H;d;};x;s/\n/={NL}=/g' file | sort | sed '1s/={NL}=//;s/={NL}=/\n/g'
 gsed '/./{H;d};x;y/\n/\v/' file | sort | sed '1s/\v//;y/\v/\n/'

 # zip up each .TXT file individually, deleting the source file and
 # setting the name of each .ZIP file to the basename of the .TXT file
 # (under DOS: the "dir /b" switch returns bare filenames in all caps).
 echo @echo off >zipup.bat
 dir /b *.txt | sed "s/^\(.*\)\.TXT/pkzip -mo \1 \1.TXT/" >>zipup.bat

TYPICAL USE: Sed takes one or more editing commands and applies all of
them, in sequence, to each line of input. After all the commands have
been applied to the first input line, that line is output and a second
input line is taken for processing, and the cycle repeats. The
preceding examples assume that input comes from the standard input
device (i.e, the console, normally this will be piped input). One or
more filenames can be appended to the command line if the input does
not come from stdin. Output is sent to stdout (the screen). Thus:

 cat filename | sed '10q'        # uses piped input
 sed '10q' filename              # same effect, avoids a useless "cat"
 sed '10q' filename > newfile    # redirects output to disk

For additional syntax instructions, including the way to apply editing
commands from a disk file instead of the command line, consult "sed &
awk, 2nd Edition," by Dale Dougherty and Arnold Robbins (O'Reilly,
1997; http://www.ora.com), "UNIX Text Processing," by Dale Dougherty
and Tim O'Reilly (Hayden Books, 1987) or the tutorials by Mike Arst
distributed in U-SEDIT2.ZIP (many sites). To fully exploit the power
of sed, one must understand "regular expressions." For this, see
"Mastering Regular Expressions" by Jeffrey Friedl (O'Reilly, 1997).
The manual ("man") pages on Unix systems may be helpful (try "man
sed", "man regexp", or the subsection on regular expressions in "man
ed"), but man pages are notoriously difficult. They are not written to
teach sed use or regexps to first-time users, but as a reference text
for those already acquainted with these tools.

QUOTING SYNTAX: The preceding examples use single quotes ('...')
instead of double quotes ("...") to enclose editing commands, since
sed is typically used on a Unix platform. Single quotes prevent the
Unix shell from intrepreting the dollar sign ($) and backquotes
(`...`), which are expanded by the shell if they are enclosed in
double quotes. Users of the "csh" shell and derivatives will also need
to quote the exclamation mark (!) with the backslash (i.e., \!) to
properly run the examples listed above, even within single quotes.
Versions of sed written for DOS invariably require double quotes
("...") instead of single quotes to enclose editing commands.

USE OF '\t' IN SED SCRIPTS: For clarity in documentation, we have used
the expression '\t' to indicate a tab character (0x09) in the scripts.
However, most versions of sed do not recognize the '\t' abbreviation,
so when typing these scripts from the command line, you should press
the TAB key instead. '\t' is supported as a regular expression
metacharacter in awk, perl, and HHsed, sedmod, and GNU sed v3.02.80.

VERSIONS OF SED: Versions of sed do differ, and some slight syntax
variation is to be expected. In particular, most do not support the
use of labels (:name) or branch instructions (b,t) within editing
commands, except at the end of those commands. We have used the syntax
which will be portable to most users of sed, even though the popular
GNU versions of sed allow a more succinct syntax. When the reader sees
a fairly long command such as this:

   sed -e '/AAA/b' -e '/BBB/b' -e '/CCC/b' -e d

it is heartening to know that GNU sed will let you reduce it to:

   sed '/AAA/b;/BBB/b;/CCC/b;d'      # or even
   sed '/AAA\|BBB\|CCC/b;d'

In addition, remember that while many versions of sed accept a command
like "/one/ s/RE1/RE2/", some do NOT allow "/one/! s/RE1/RE2/", which
contains space before the 's'. Omit the space when typing the command.

OPTIMIZING FOR SPEED: If execution speed needs to be increased (due to
large input files or slow processors or hard disks), substitution will
be executed more quickly if the "find" expression is specified before
giving the "s/.../.../" instruction. Thus:

   sed 's/foo/bar/g' filename         # standard replace command
   sed '/foo/ s/foo/bar/g' filename   # executes more quickly
   sed '/foo/ s//bar/g' filename      # shorthand sed syntax

On line selection or deletion in which you only need to output lines
from the first part of the file, a "quit" command (q) in the script
will drastically reduce processing time for large files. Thus:

   sed -n '45,50p' filename           # print line nos. 45-50 of a file
   sed -n '51q;45,50p' filename       # same, but executes much faster

If you have any additional scripts to contribute or if you find errors
in this document, please send e-mail to the compiler. Indicate the
version of sed you used, the operating system it was compiled for, and
the nature of the problem. To qualify as a one-liner, the command line
must be 65 characters or less. Various scripts in this file have been
written or contributed by:

 Al Aab                   # founder of "seders" list
 Edgar Allen              # various
 Yiorgos Adamopoulos      # various
 Dale Dougherty           # author of "sed & awk"
 Carlos Duarte            # author of "do it with sed"
 Eric Pement              # author of this document
 Ken Pizzini              # author of GNU sed v3.02
 S.G. Ravenhall           # great de-html script
 Greg Ubben               # many contributions & much help
-------------------------------------------------------------------------

Gentoo Install with LVM/EFI via Ansible

Assumptions: You have a host with Ansible and a network.

Download the Gentoo iso from here.
Download the role from here.

You will need to edit:
gentoobase/vars/main.yml - encrypt password

Boot with the ISO (cached), ensuring that networking is present.

Once booted, set a password and start the ssh daemon.

Unmount the ISO.

SSH as the root user to the target server.
mkdir .ssh
Copy the pubkey of the user executing the playbook into /root/.ssh/authorized_keys

CD to your playbook role directory.
Unpack the role tarball
Create the playbook below.

Playbook

---
- name: Base Gentoo Installation
gather_subset: min
hosts: vms
tasks:
- import_role:
name: gentoobase
...
 ansible-playbook -u root gentoo_install_base.yml

This will take ~3 hours to complete the base system.

Timings are based on a VM (i7 6700K x4, 16Gb RAM)

If you wish to change any settings, edit:
roles/gentoobase/vars/main.yml

Now go outside and get some fresh air.

The below is to understand the build process.

Manual Steps

Partition the HDD:
gdisk /dev/Xda
part1 = 512M 8300 [boot]
part2 = 100M ef00 efi [efi]
part3 = LVM 8e00 [LVM]
part4 = 4G 8200 [swap]

Create LVMs:

pvcreate /dev/Xda2
vgcreate vg00 /dev/Xda2
lvcreate -L 20G -n root vg00
lvcreate -L 10G -n home vg00

Format FileSystems:

mke2fs -t ext4 -L BOOT /dev/Xda1
mkfs.vfat -F 32 -n EFI /dev/Xda2
mke2fs -t ext4 -L ROOT /dev/mapper/vg00-root
mke2fs -t ext4 -L HOME /dev/mapper/vg00-home

Mount FileSystems:

mount -t ext4 /dev/mapper/vg00-root /mnt/gentoo
mkdir -p /mnt/gentoo/boot/EFI
mount -t ext4 /dev/vda1 /mnt/gentoo/boot
mount -t vfat /dev/vda2 /mnt/gentoo/boot/EFI
mount swap if configured

SCP the stage3 and portage files to the VM

Download Tarballs:

wget https://distfiles.gentoo.org/releases/amd64/autobuilds/current-stage3-amd64-systemd/stage3-amd64-systemd-20240616T153408Z.tar.xz

wget https://gentoo.osuosl.org/snapshots/portage-latest.tar.xz

Unpack files:

tar xpf stage3...xz -C /mnt/gentoo
tar xpf portage-latest...xz -C /mnt/gentoo/usr/

Mount Some More FileSystems:

mount -t proc /proc /mnt/gentoo/proc
mount --rbind /sys /mnt/gentoo/sys
mount --make-rslave /mnt/gentoo/sys
mount --rbind /dev /mnt/gentoo/dev
mount --make-rslave /mnt/gentoo/dev
mount --rbind /run /mnt/gentoo/run
mount --make-rslave /mnt/gentoo/run
test -L /dev/shm && rm /dev/shm && mkdir /dev/shm
mount -t tmpfs -o nosuid,nodev,noexec shm /dev/shm
chmod 1777 /dev/shm

Setup Rsync Mirror:

mirrorselect -i -o >> /mnt/gentoo/etc/portage/make.conf

DNS:
cp -L /etc/resolv.conf /mnt/gentoo/etc/resolv.conf

Setup Portage:

mkdir /mnt/gentoo/var/db/repos/gentoo
mkdir /mnt/gentoo/etc/portage/repos.conf
nano -w /mnt/gentoo/etc/portage/repos.conf/gentoo.conf
[DEFAULT]
main-repo = gentoo
[gentoo]
location = /usr/portage
sync-type = rsync
sync-uri = rsync://rsync.europe.gentoo.org/gentoo-portage

Chroot into the VM:

chroot /mnt/gentoo /bin/bash
env-update
source /etc/profile

Set Locale:

ln -sf /usr/share/zoneinfo/Europe/London /etc/localtime
nano -w /etc/locale.gen
    en_GB.UTF-8 UTF-8
Execute locale-gen

Set Profile:

eselect profile list (choose the number in brackets)
"[30]  default/linux/amd64/23.0/no-multilib/systemd (stable)"
eselect profile set 30

Let's Start Building:

emerge -av gentoo-sources
ln -s /usr/src/linux-<version>-gentoo /usr/src/linux
cd /usr/src/linux
make defconfig && make && make modules_install
cp arch/x86_64/boot/bzImage /boot/kernel-<version>
cp .config /boot/config-<version>-gentoo (optional)
cpan Locale::gettext
emerge -q vim genkernel grub lvm2 gptfdisk efibootmgr

Setup Grub:

grub-install --target=x86_64-efi --efi-directory=/boot/EFI /dev/Xda
vi /etc/default/grub
    GRUB_CMDLINE_LINUX="rootfstype=ext4 init=/usr/lib/systemd/systemd dolvm"

Update fstab:

blkid
Copy the UUID for /boot and /
UUID1=$(blkid | grep Xda1 | grep -Po "(UUID.*?)\"\s")
UUID2=$(blkid | grep Xda2 | grep -Po "(UUID.*?)\"\s")
echo -e "${UUID1}\t/boot\text4\tdefaults\t1 2" >> /etc/fstab
echo -e "${UUID2}\t/\text4\tdefaults\t1 1" >> /etc/fstab
cd /etc/
cp -p genkernel.conf genkernel.conf.orig
vi genkernel.conf

uncomment:
MAKEOPTS="$(portageq envvar MAKEOPTS)"
LVM="yes"

genkernel initramfs --lvm (this does not overwrite the kernel above)
grub-mkconfig -o /boot/grub/grub.cfg

passwd

emerge -q networkmanager gentoolkit gpm
systemctl enable sshd NetworkManager

Storcli Basics

Description Command
Show all adaptors storcli /call show
Show all virtual drives storcli /call/vall show
Show all physical drives storcli /call/dall show all
Show all enclosures storcli /call/eall show
Show all BBU storcli /call/bbu show
Show all CacheVault storcli /call/cv show
Show all foreign configuration storcli /call/fall show
Show Rebuild state storcli /c0/e8/s0 show rebuild
Show Boot Drive storcli /c0 show bootdrive
Delete all foreign configuration storcli /call/fall delete
Delete all virtual drives from controller #0 storcli /c0/vall delete
Delete all virtual drives from all controllers storcli /call/vall delete
Locate physical disk storcli /c0/e8/s2 start locate
Set Controller0 to JBOD mode storcli /c0 set jbod=on
Set Boot Drive storcli /c0/e252/s0 set bootdrive=on
Add disk to array storcli /c0/e32/s12 insert dg=0 array=0 row=0

Replace disk in the RAID

If a disk has failed but the RAID is still up, you can replace the failed disk. This example adds the disk in enclosure 8 slot 0 to DriveGroup 0 array 0 row 0 where the failed disk was before. The failed disk has to be in a Missing state before it can be replaced:

storcli /c0/e8/s0 insert dg=0 array=0 row=0

Locate Dying Disks

storcli /c0/eALL/sALL show all | grep -e 'State :' -e "Predictive Failure Count"

Pesky Control Characters

For when plain text goes mad. Handy for printf, sed, vim

Control Characters

CTRL   (^D means to hold the CTRL key and hit d)

Oct  Dec Char  Hex  Key    Comments
\000   0  NUL  \x00  ^@ \0 (Null byte)
\001   1  SOH  \x01  ^A    (Start of heading)
\002   2  STX  \x02  ^B    (Start of text)
\003   3  ETX  \x03  ^C    (End of text)
\004   4  EOT  \x04  ^D    (End of transmission)
\005   5  ENQ  \x05  ^E    (Enquiry)
\006   6  ACK  \x06  ^F    (Acknowledge)
\007   7  BEL  \x07  ^G    (Ring terminal bell)
\010   8   BS  \x08  ^H \b (Backspace)  (\b matches backspace inside [] only)
\011   9   HT  \x09  ^I \t (Horizontal tab)
\012  10   LF  \x0A  ^J \n (Line feed)
\013  11   VT  \x0B  ^K    (Vertical tab)
\014  12   FF  \x0C  ^L \f (Form feed)
\015  13   CR  \x0D  ^M \r (Carriage return)
\016  14   SO  \x0E  ^N    (Shift out)
\017  15   SI  \x0F  ^O    (Shift in)
\020  16  DLE  \x10  ^P    (Data link escape)
\021  17  DC1  \x11  ^Q    (Device control 1) (XON) (Default UNIX START char.)
\022  18  DC2  \x12  ^R    (Device control 2)
\023  19  DC3  \x13  ^S    (Device control 3) (XOFF)  (Default UNIX STOP char.)
\024  20  DC4  \x14  ^T    (Device control 4)
\025  21  NAK  \x15  ^U    (Negative acknowledge)
\026  22  SYN  \x16  ^V    (Synchronous idle)
\027  23  ETB  \x17  ^W    (End of transmission block)
\030  24  CAN  \x18  ^X    (Cancel)
\031  25  EM   \x19  ^Y    (End of medium)
\032  26  SUB  \x1A  ^Z    (Substitute character)
\033  27  ESC  \x1B  ^[    (Escape)
\034  28  FS   \x1C  ^\    (File separator, Information separator four)
\035  29  GS   \x1D  ^]    (Group separator, Information separator three)
\036  30  RS   \x1E  ^^    (Record separator, Information separator two)
\037  31  US   \x1F  ^_    (Unit separator, Information separator one)
\177 127  DEL  \x7F  ^?    (Delete)

Printable Characters

Specials (32-47)

Oct  Dec Char Hex    Comments
\040  32 " " \x20    (space)
\041  33  !  \x21    EXCLAMATION POINT(bang)
\042  34  "  \x22    QUOTATION MARK, DIAERESIS
\043  35  #  \x23:   NUMBER SIGN (Pound sign)
\044  36  $  \x24    DOLLAR SIGN
\045  37  %  \x25    PERCENT SIGN
\046  38  &  \x26    AMPERSAND
\047  39  '  \x27    APOSTROPHE, RIGHT SINGLE QUOTATION MARK, ACUTE ACCENT (single quote)
\050  40  (  \x28    LEFT PARENTHESIS  (open parenthesis)
\051  41  )  \x29    RIGHT PARENTHESIS (close parenthesis)
\052  42  *  \x2A    ASTERISK
\053  43  +  \x2B    PLUS SIGN
\054  44  ,  \x2C    COMMA, CEDILLA
\055  45  -  \x2D    HYPHEN, MINUS SIGN
\056  46  .  \x2E    PERIOD, DECIMAL POINT, (Full Stop)
\057  47  /  \x2F    SLANT (SOLIDUS), slash

Digits

Oct  Dec Char Hex
\060  48  0  \x30
\061  49  1  \x31
\062  50  2  \x32
\063  51  3  \x33
\064  52  4  \x34
\065  53  5  \x35
\066  54  6  \x36
\067  55  7  \x37
\070  56  8  \x38
\071  57  9  \x39

Specials (58-64)

Oct  Dec Char Hex    Comments
\072  58  :  \x3A    COLON
\073  59  ;  \x3B    SEMICOLON
\074  60  <  \x3C    LESS-THAN SIGN  (left angle bracket)
\075  61  =  \x3D    EQUALS SIGN
\076  62  >  \x3E    GREATER-THAN SIGN  (right angle bracket)
\077  63  ?  \x3F    QUESTION MARK
\100  64  @  \x40    COMMERCIAL AT

Latin Capital Letters

Oct  Dec Char Hex       Oct  Dec Char Hex       Oct  Dec Char Hex
\101  65  A  \x41	\112  74  J  \x4A	\123  83  S  \x53
\102  66  B  \x42	\113  75  K  \x4B	\124  84  T  \x54
\103  67  C  \x43	\114  76  L  \x4C	\125  85  U  \x55
\104  68  D  \x44	\115  77  M  \x4D	\126  86  V  \x56
\105  69  E  \x45	\116  78  N  \x4E	\127  87  W  \x57
\106  70  F  \x46	\117  79  O  \x4F	\130  88  X  \x58
\107  71  G  \x47	\120  80  P  \x50	\131  89  Y  \x59
\110  72  H  \x48	\121  81  Q  \x51	\132  90  Z  \x5A
\111  73  I  \x49	\122  82  R  \x52

Specials (91-96)

Oct  Dec Char Hex    Comments
\133  91  [  \x5B    LEFT (SQUARE) BRACKET (open bracket) 
\134  92  \  \x5C    REVERSE SLANT (REVERSE SOLIDUS) (backslash, backslant) 
\135  93  ]  \x5D    RIGHT (SQUARE) BRACKET (closing bracket) 
\136  94  ^  \x5E    CIRCUMFLEX ACCENT 
\137  95  _  \x5F    UNDERLINE (LOW LINE)
\140  96  `  \x60    LEFT SINGLE QUOTATION MARK, GRAVE ACCENT 

Latin Small Letters

Oct  Dec Char Hex       Oct  Dec Char Hex       Oct  Dec Char Hex
\141  97  a  \x61	\152 106  j  \x6A	\163 115  s  \x73
\142  98  b  \x62	\153 107  k  \x6B	\164 116  t  \x74
\143  99  c  \x63	\154 108  l  \x6C	\165 117  u  \x75
\144 100  d  \x64	\155 109  m  \x6D	\166 118  v  \x76
\145 101  e  \x65	\156 110  n  \x6E	\167 119  w  \x77
\146 102  f  \x66	\157 111  o  \x6F	\170 120  x  \x78
\147 103  g  \x67	\160 112  p  \x70	\171 121  y  \x79
\150 104  h  \x68	\161 113  q  \x71	\172 122  z  \x7A
\151 105  i  \x69	\162 114  r  \x72

Specials (123-126)

Oct  Dec Char Hex    Comments
\173 123  {  \x7B    LEFT BRACE (LEFT CURLY BRACKET) (open brace)
\174 124  |  \x7C    VERTICAL LINE (pipe)
\175 125  }  \x7D    RIGHT BRACE (RIGHT CURLY BRACKET) (closing brace)
\176 126  ~  \x7E    TILDE (OVERLINE) (squiggle)

Control (127)

Oct  Dec Char Hex Key   Comments
\177 127 DEL \x7F ^?    (Delete)