Tag Archives: linux

DNS/DHCP server

Generating an RNDC key.

The rndc tool is used to managed the named daemon.
We need to generate a keyfile called /etc/bind/rndc.key which is referenced both by /etc/bind/rndc.conf and /etc/bind/named.conf

To do this we use the following command;

# rndc-confgen -a -c /etc/bind/rndc.key

BIND (NAMED) /etc/bind/named.conf

IP addresses and host names have obviously been changed.. I'm not *THAT* stupid ;)

The config file

Forwarder file: /etc/bind/pri/forwarddns

The config file

Reverse zone: /etc/bind/pri/reversedns

The config file

Trouble Shooting Bind

Depending on your connection/setup you may see the following in your log.

09-Feb-2011 11:19:14.234 edns-disabled: info: success resolving 'markmail.org/AAAA' (in 'org'?) after disabling EDNS

or

09-Feb-2011 11:18:38.986 edns-disabled: info: success resolving 'lists.isc.org/A' (in 'isc.org'?) after reducing the advertised EDNS UDP packet size to 512 octets

These on their own are harmless enough.. they just flood your log :)  They can be turned off by adding the following to your named.conf:

logging {
category lame-servers {null; };
category edns-disabled { null; };
};

Another issue I came across at the same time as above was 95% of all my DNS requests were timing out.  This, coincidentally was when I upgraded my internet connection to a 30Mbit VirginMedia with "super hub".   I found this was caused by the "IP flood protection" in the router settings.  Disabling this solved the timeout issue and also stopped any edns errors flooding the logs.


You may receive one or both of the following lines in bind log.

pri/example.com.signed:10: signature has expired

To remedy this this, run the following command (manual signing only):

cd /etc/bind/pri
dnssec-signzone -A -3 $(head -c 10 /dev/random | sha256sum | cut -b 1-16) -N INCREMENT -o example.com -t example.com

OR

/var/bind/named.cache:2: signature has expired

To remedy this this, run the following command:

/usr/bin/wget --user=ftp --password=ftp ftp://ftp.rs.internic.net/domain/root.zone -O /var/bind/named.cache
/usr/sbin/rndc reload

CHROOT

If you are security conscious then you can "jail" the named process which if broken into will lock the perp in the chrooted named directories only... as these files are replaced upon restarting bind, it doesn't matter if they are damaged/compromised.

To setup a chroot envirnnment, just do the following.

1) Setup named as above so that everything is working.
2) Uncomment 'CHROOT="/chroot/dns"' in /etc/conf.d/named
3) execute emerge --config net-dns/bind
4) restart named

You should get the following:

* Starting chrooted named ...
* Mounting chroot dirs
* mounting /etc/bind to /chroot/dns/etc/bind
* mounting /var/bind to /chroot/dns/var/bind
* mounting /var/log/named to /chroot/dns/var/log/named                                                                                                                                [ ok ]

DNSSEC

Automagically

In the "options" block of named.conf, make sure the below lines are present.

dnssec-enable yes;
dnssec-validation yes;
key-directory "/var/bind/pri";
inline-signing yes;

Further down where your zones are defined, you should have something like this.

zone "example.com" IN {
type master;
file "pri/example.com";
notify yes;
allow-update { key "rndc-key"; };
inline-signing yes;
auto-dnssec maintain;
};

Restart named and you should see for each zone with inline-signing enabled.

example.com
example.com.jbk
example.com.jnl
example.com.signed
example.com.signed.jnl

 The auto signing way seems to be more reliable as using the manual method, named would fail to find the private keys randomly several times per day.

Manually

In /etc/bind/named.conf, ensure the following are present in the options block:

dnssec-enable yes;
dnssec-validation yes;
key-directory "/var/bind/pri";

Next cd to either /var/bind/pri or /etc/bind/pri.

Now we'll create a Zone Signing Key (ZSK):

dnssec-keygen -a RSASHA256 -b 2048 -n ZONE example.com

Note: You need to create telemetry or this will take hours. Start a big emerge or fire up a VM.

Next we'll create a Key Signing Key (KSK)

dnssec-keygen -f KSK -a RSASHA256 -b 2048 -n ZONE example.com

Note: You need to create telemetry or this will take hours. Start a big emerge or fire up a VM.

You should have 1 pair of KSK and ZSK files.

Kexample.com.+008+00712.key
Kexample.com.+008+00712.private
Kexample.com.+008+12951.key
Kexample.com.+008+12951.private

Now add the key files to the bottom of the zone file. eg

$INCLUDE Kexample.com.+008+00712.key
$INCLUDE Kexample.com.+008+12951.key

Now we need to sign the zone file:

dnssec-signzone -A -3 $(head -c 10 /dev/random | sha256sum | cut -b 1-16) -N INCREMENT -o example.com -t example.com

This creates a new file named example.com.zone.signed which contains RRSIG records for each DNS record. We have to tell BIND to load this "signed" zone.
Open the bind config file /etc/bind/named.conf and add the signed file to the zone block. eg

zone "example.com" IN {
        type master;
        file "pri/example.com.signed";
        notify yes;
        allow-update { key "rndc-key"; };
        inline-signing yes;
};

That's it. Reload/restart bind and you should be golden ;)

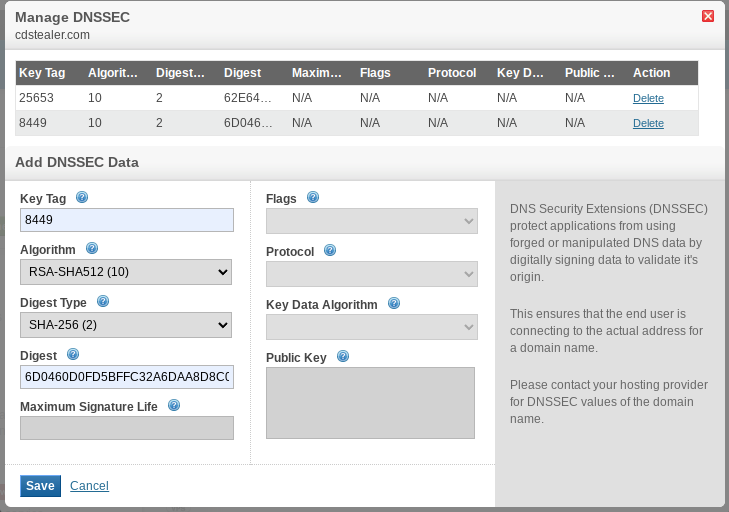
If you're using a 3rd party DNS, you will need to add the DS and DNSSEC public keys.

There should be a dsset-example.com file within /var/bind/pri, cat this and you will see:

example.com. IN DS 8449 10 2 817AC0B85419C947608AAF54ED52F137137DA157F3B86C1B08509495 5E917C14

You may have several .key files, if you need to add another DS record, you can run the command:

dnssec-dsfromkey <Kexmaple.com....key>

Add the output to the dsset-example.com file and also the external nameserver provider.

Note: Remove the space from the Digest key.

We would also need to add the corresponding DNSSEC public key.  To do this, we need to cat the contents:

# cat /var/bind/keys/Kexample.com.+010+08449.key
; This is a key-signing key, keyid 8449, for example.com.
; Created: 20151115172130 (Mon Nov 15 17:21:30 2015)
; Publish: 20151115172130 (Mon Nov 15 17:21:30 2015)
; Activate: 20151115172130 (Mon Nov 15 17:21:30 2015)
example.com. IN DNSKEY 257 3 10 AwEAAdi4syP6xRyXjjGngSvFn51GR85AvWSqUCyST9CM6tJWEiRwEpTJ ....

Unfortunately this was unavailable with the provider I was with.

Testing

To varify that DNSSEC is used by the 3rd party nameservers, you can use this tool: https://dnssec-analyzer.verisignlabs.com/

You can also test your internal DNS by executing:

named-checkzone -D -f raw -o - example.com example.com.signed

This will output the encryption for each entry in the zone file.

# named-checkzone -D -f raw -o - cdstealer.com cdstealer.com.signed
zone cdstealer.com/IN: loaded serial 201421440 (DNSSEC signed)...

How to setup a DHCP that will update the dns records of bind.


DHCP /etc/dhcp/dhcp.conf

The config file

Then add the following to the top of /etc/conf/named

OPTIONS="-4"
ENABLE_ZONE_WRITE=yes

Now restart named & dhcpd. If you get any errors, check /var/log/messages and double check your work.


Email Server

Emerge exim, dovecot, spamassassin, clamav and of course all dependencies.

Now to configure them to work together.  First we'll configure Exim4.

The config file.

I strongly suggest reading the provided example in /etc/exim as everything is well commented.

To generate the certificate  for ssmtp/smtps use this command:

openssl genrsa -out email.key 1024
openssl req -new -key email.key -out email.csr
openssl x509 -req -days 3650 -in email.csr -signkey email.key -out email.crt
chown mail: email.key
chmod 600 email.key
chmod 644 email.crt

Ensure these go somewhere safe and accessible to the application(s).

To setup server side filtering(rules) include the file below in the users $home.

The config file

Again, there is a well commented example with the install.  [net-mail/dovecot-1.2*]

The config file

Upgrading Dovecot v1.2 to v2.0

A lot of settings have changed. Dovecot v2.0 can still use most of the v1.x configuration files, but it logs a lot of warnings at startup. A quick and easy way to convert your old config file to v2.0 format is:

doveconf -n -c dovecot-1.conf > dovecot-2.conf

This command logs a warning about each obsolete setting it converts to the new format. You can either go through the warnings to figure out what changes exactly were done, or you can simply trust doveconf and replace your old config with the newly generated one.

Once running v2.0, it's safe to downgrade to v1.2.5 or newer. Older versions don't understand some of the changes to index files and will log errors.

Other important changes:

  • Dovecot uses two system users for internal purposes now by default: "dovenull" and "dovecot". You need to create the "dovenull" user or change default_login_usersetting. "dovenull" user is used by completely untrustworthy processes, while "dovecot" user is used for slightly more trusted processes.
    • If you want to be using something else than "dovecot" as the other user, you need to change default_internal_user setting.
    • Just like with "dovecot" user, "dovenull" doesn't need a password, home directory or anything else (but it's good to give it its own private "dovenull" group).
  • no more convert plugin, use dsync instead
  • no more expire-tool, use doveadm expunge instead. also expire configuration is different.
  • Post-login scripts are configured differently and need to be modified
  • Quota warnings are configured differently and the script may need to be modified (most environment settings like $USER are gone)
  • Global ACL filenames now require namespace prefix (e.g. if you use "INBOX." prefix, /etc/acls/foo needs to be renamed to /etc/acls/INBOX.foo
  • Maildir: Permissions for newly created mail files are no longer copied from dovecot-shared file, but instead from the mail directory (e.g. for "foo" mailbox, they're taken from ~/Maildir/.foo directory)
  • dbox: v2.0 format is slightly different, but backwards compatible. The main problem is that v2.0 no longer supports maildir-dbox hybrid resulting from "fast Maildir migration". If you have any Maildir files in your dbox, you need to convert them somehow (some examples). You might also consider using dsync to get rid of the old unused metadata in your dbox files.
  • Pre-login and post-login CAPABILITY reply is now different. Dovecot expects clients to recognize new automatically sent capabilities. This should work with all commonly used clients, but some rarely used clients might have problems. Either get the client fixed, or set imap_capability manually.
  • ManageSieve protocol was assigned an official port by IANA: 4190. This is used by Pigeonhole by default now. If you want to listen also on the old 2000 port, see the Pigeonhole/ManageSieve/Configuration example.
  • dovecot --exec-mail imap has been replaced by simply running "imap" binary. You can also use "imap -u <username>" to access other users' mails more easily.

LDA

  • deliver binary was renamed to dovecot-lda (but a symlink still exists for now)
  • -n parameter was replaced by lda_mailbox_autocreate setting. The default also changed to "no".
  • -s parameter was replaced by lda_mailbox_autosubscribe setting. The default is "no", as before.

Configs:

Don't forget that ALL the configs have now changed.  No longer does everything reside in /etc/dovecot/dovecot.conf but in the following files:

# ls -1 /etc/dovecot/conf.d/
10-auth.conf
10-director.conf
10-logging.conf
10-mail.conf
10-master.conf
10-ssl.conf
15-lda.conf
20-imap.conf
20-lmtp.conf
20-pop3.conf
90-acl.conf
90-plugin.conf
90-quota.conf
auth-checkpassword.conf.ext
auth-deny.conf.ext
auth-ldap.conf.ext
auth-master.conf.ext
auth-passwdfile.conf.ext
auth-sql.conf.ext
auth-static.conf.ext
auth-system.conf.ext
auth-vpopmail.conf.ext

Hopefully the file names should indicate what does what.

/etc/dovecot/dovecot.conf:
protocols = imap [imaps is no longer valid]

Most of the settings from the v1.2 config can be transferred to the relevant configs above.

Global changes are in /etc/spamassassin/local.cf, user rules are ~/.spamassassin/user.prefs.  However, user_prefs is ignored when using spamd (daemon).  Also user.prefs can be insecure and also increase server load.
I personally add my whitelist/blackdays addresses in the global file.  Example below:

The config file

A comprehensive list of options can be found here.

I also added grey listing to my setup.

Instructions here.

Gentoo Install

You can download a minimal install iso from here
It is assumed that you have some knowledge of Linux and how hardware is detected.

'#' = Direct command
Tips:* Once booted into the cd, press CTRL, ALT & F2 and enter

# lspci

This lists your hardware, you may need to refer to this later.*

Research... Gentoo has a fantastic user community and documentation.  If you're using the USB install the root is auto mounted under /mnt/cdrom.

Hard drive setup:-
# fdisk /dev/sda

A typical filesystem layout I use is this on an 80Gb drive.

Set partition 1 to +100M (boot)
Set partition 2 to +40G (root)
Set partition 3 to +30G (home)
Set partition 4 to the remainder (swap)

Press "t", select partition 4 then enter code 82.
Press "a", select partition 1 then "w" to write changes.

# mke2fs -L BOOTFS -t ext4 /dev/sda1
# mke2fs -L ROOTFS -t ext4 /dev/sda2
# mke2fs -L HOMEFS -t ext4 /dev/sda3
# mkswap -L SWAPFS /dev/sda4
# swapon /dev/sda4
# mount -t ext4 /dev/sda2 /mnt/gentoo
# mkdir /mnt/gentoo/boot
# mount /dev/sda1 /mnt/gentoo/boot
# cd /mnt/gentoo
Stage & Portage installation:-
# links http://www.gentoo.org/main/en/mirrors.xml
(move the highlight bar to the desired URL and hit enter.)
Move to releases and hit enter.
Select the correct arch (amd64.)
Select releases
Select your arch and hit enter. (amd64)
Select autobuilds hit enter
Select current-stage3-amd64-systemd
Select the stage file. (stage3-amd64-systemd-YYYYMMDD.tar.bz2)
select ok to save.
Go up 4 levels
Select snapshots
Select the most recent file. (portage-YYYYMMDD.tar.bz2)
# tar -xjpf stageXXX
# tar -xjf portage-XXX -C /mnt/gentoo/usr
#nano -w /mnt/gentoo/etc/portage/make.conf
press CTRL+X to exit, Y to accept changes and ENTER to save.
If you wish to define the CPU arch, please refer to this.
Also, please refer to the global useflags that maybe required depending on your end game.
# mirrorselect -i -o >> /mnt/gentoo/etc/portage/make.conf
# mount -t proc none /mnt/gentoo/proc
# mount --types proc /proc /mnt/gentoo/proc
# mount --rbind /sys /mnt/gentoo/sys
# mount --make-rslave /mnt/gentoo/sys
# mount --rbind /dev /mnt/gentoo/dev
# mount --make-rslave /mnt/gentoo/dev
# cp -L /etc/resolv.conf /mnt/gentoo/etc/resolv.conf
!!!!NOTE:  Do not be tempted to add customisation at this stage.  It is better to get the base system built, bootable and stable.
Portage rsync configs are now located in /etc/portage/repos.conf/gentoo.conf

Create the directory:

# mkdir /etc/portage/repos.conf

Then create gentoo.conf with the content below.

[DEFAULT]
main-repo = gentoo
[gentoo]
location = /usr/portage
sync-type = rsync
sync-uri = rsync://rsync.europe.gentoo.org/gentoo-portage
Entering the Gentoo Environment:-
# chroot /mnt/gentoo /bin/bash
# env-update
# source /etc/profile
Install the Kernel:-
# emerge -av gentoo-sources
# cd /usr/src/linux

# make menuconfig
(configure the kernel for your system)

# make && make modules_install

# cp arch/x86_64/boot/bzimage /boot/kernel-?.?.?-gentoo-r?

# cp .config /boot/config-?.?.?-gentoo-r?

Note:  If unmasking a kernel, ensure you also unmask the linux-headers of the same version.
Setup root user password:-
# passwd
Setup Localtime:-
# ln -sf /usr/share/zoneinfo/Europe/London /etc/localtime
Setup FSTAB:-
# nano -w /etc/fstab

LABEL=BOOTFS    /boot   ext4    noauto,noatime    1 2
LABEL=SWAPFS    none    swap    sw                0 0
LABEL=ROOTFS    /       ext4    noatime           0 1
LABEL=HOMEFS    /home   ext4    noatime           0 1
Setup Grub (boot loader):-
# emerge grub
# grub-install /dev/sda
# grub-mkconfig -o /boot/grub/grub.cfg

!!! NOTE !!!
If grub fails to compile with the error "illegal instruction", as this is the first item you are compiling.  There is a good chance that the stage3 tarball is at fault.  Try using an older archive.It's also worth noting that if you are using systemd instead of initrc you should amend the following line in /etc/default/grub to save any headaches when adding a different kernel. Append parameters to the linux kernel command line for non-recovery entries:

GRUB_CMDLINE_LINUX_DEFAULT="rootfstype=ext4 init=/usr/lib/systemd/systemd"
 install systemd & networkmanager

* you may need to unmerge udev & libudev

# cd
# umount /mnt/gentoo/boot /mnt/gentoo/proc /mnt/gentoo
# reboot
REBOOT!

Login and enable NetworkManager.

systemctl enable NetworkManager

Now we have a bootable system, we can squeeze a little more speed from compiling.
Also, I highly recommend this if you're using an SSD.
Portage TMPFS

Setup hostname:-
# hostnamectl set-hostname <hostname>
Setup keyboard locale:-
# localectl set-keymap uk
Network Time:-
# systemctl enable systemd-timesyncd

Time servers are defined in /etc/systemd/timesyncd.conf.

Setup system log:-
# emerge syslog-ng logrotate
# systemctl enable syslog-ng@default
 YOU NOW HAVE GENTOO INSTALLED BUT NO GUI OR APPZ...
Now REBOOT
Select system profile
Then execute:
# eselect profile list
Available profile symlink targets:
[1] default/linux/amd64/13.0
[2] default/linux/amd64/13.0/selinux
[3] default/linux/amd64/13.0/desktop
[4] default/linux/amd64/13.0/desktop/gnome
[5] default/linux/amd64/13.0/desktop/gnome/systemd
[6] default/linux/amd64/13.0/desktop/kde
[7] default/linux/amd64/13.0/desktop/kde/systemd
[8] default/linux/amd64/13.0/desktop/plasma
[9] default/linux/amd64/13.0/desktop/plasma/systemd
[10] default/linux/amd64/13.0/developer
[11] default/linux/amd64/13.0/no-multilib
[12] default/linux/amd64/13.0/systemd *
[13] default/linux/amd64/13.0/x32
[14] hardened/linux/amd64
[15] hardened/linux/amd64/selinux
[16] hardened/linux/amd64/no-multilib
[17] hardened/linux/amd64/no-multilib/selinux
[18] hardened/linux/amd64/x32
[19] hardened/linux/musl/amd64
[20] hardened/linux/musl/amd64/x32
[21] default/linux/uclibc/amd64
[22] hardened/linux/uclibc/amd64
Then execute:
# eselect profile set 11
executing:
# emerge -uvnD world will install/rebuild the the required packages for that profile. This may take a few hours.
OK.  If everything went to plan you should now have a basic Gentoo installation.  Now for the hard bit :D

These are only my recommendations:-

create /etc/locale.gen and add "en_GB.UTF8 UTF-8"

# emerge ufed

Set any required global use flags via ufed.  Some useful ones are:

X bluetooth branding cacert cairo consolekit corefonts cups dbus egl evdev flac gd gif gles2 gnome gnome-keyring gnutls gpm gtk icu jpeg jpeg2k ibnotify mmx mp3 mpi nautilus networkmanager offensive office ogg opengl png policykit pulseaudio python qt4 smp sse sse2 sse4 sse4_1 ssse3 svg syslog systemd tiff truetype udev disks usb uxa vhosts vim-syntax vorbis xkb -bindist -ipv6 -widevine

If you don't want to set any global flags, you can opt to set these on a per package basis (recommended).

If you do define/remove any global flags, ensure you run an "emerge -puvND world" and rebuild any packages.

Example only:

/etc/portage/package.use/qtwebkit
dev-qt/qtwebkit printsupport

/etc/portage/package.use/iputils
net-misc/iputils -caps -filecaps

/etc/portage/package.use/libpng
media-libs/libpng apng

/etc/portage/package.use/python
dev-lang/python sqlite

/etc/portage/package.use/ffmpeg
media-video/ffmpeg opus vpx aac aacplus bluray cdio faac fdk x264 xvid
virtual/ffmpeg threads -vdpau x264

/etc/portage/package.use/libpcre
dev-libs/libpcre pcre16

/etc/portage/package.use/qtkeychain
dev-libs/qtkeychain qt5

/etc/portage/package.use/zlib
sys-libs/zlib minizip

/etc/portage/package.use/cogl
media-libs/cogl gles2

/etc/portage/package.use/mesa
media-libs/mesa gles2

# emerge -evD system (optional but recommended)
[this will rebuild the install for your architecture. It may take a while]

#emerge gentoolkit
[this will install some handy tools. One is below]

# revdep-rebuild
[this will reinstall any dependencies. Add a "-p" to see what will be done]

Now it's time to get a GUI installed.

Install GDM & Gnome
Install your Desktop Environment.

# emerge av gdm gnome-light

Once complete enable gdm to autostart
# systemctl enable gdm

Caveats and Cleanups
Gnome-terminal may not start

# locale-gen

And then:

# localectl set-locale LANG="en_GB.UTF-8"

And reboot.

Gnome-shell screen cast may not work.

You may get the error:

gnome-session[736]: ** (gnome-shell:805): WARNING **: ShellRecorder: failed to parse pipeline: no element "vp9enc"
gnome-session[736]: ** (gnome-shell:805): CRITICAL **: shell_recorder_close: assertion 'recorder->state != RECORDER_STATE_CLOSED' failed

To fix this, ensure that gst-plugins-good, libvpx & ffmpeg are installed.

There you have it.  A full Gentoo Linux install with a Gnome3 desktop.

Time to spend a few more hours emerging your apps: ;)

A few useful apps are:

extundelete 
app-misc/screen 
libreoffice (take >1 hour)
google-chrome
firefox
app-admin/keepassx 
eog 
gimp 
vim 
corefonts
linux-firmware
dosfstools
chrome-binary-plugins
gnome-tweak-tool