Generating an RNDC key.
The rndc tool is used to managed the named daemon.
We need to generate a keyfile called /etc/bind/rndc.key which is referenced both by /etc/bind/rndc.conf and /etc/bind/named.conf
To do this we use the following command;
# rndc-confgen -a -c /etc/bind/rndc.key
BIND (NAMED) /etc/bind/named.conf
IP addresses and host names have obviously been changed.. I'm not *THAT* stupid ;)
Forwarder file: /etc/bind/pri/forwarddns
Reverse zone: /etc/bind/pri/reversedns
Trouble Shooting Bind
Depending on your connection/setup you may see the following in your log.
09-Feb-2011 11:19:14.234 edns-disabled: info: success resolving 'markmail.org/AAAA' (in 'org'?) after disabling EDNS
or
09-Feb-2011 11:18:38.986 edns-disabled: info: success resolving 'lists.isc.org/A' (in 'isc.org'?) after reducing the advertised EDNS UDP packet size to 512 octets
These on their own are harmless enough.. they just flood your log :) They can be turned off by adding the following to your named.conf:
logging {
category lame-servers {null; };
category edns-disabled { null; };
};
Another issue I came across at the same time as above was 95% of all my DNS requests were timing out. This, coincidentally was when I upgraded my internet connection to a 30Mbit VirginMedia with "super hub". I found this was caused by the "IP flood protection" in the router settings. Disabling this solved the timeout issue and also stopped any edns errors flooding the logs.
You may receive one or both of the following lines in bind log.
pri/example.com.signed:10: signature has expired
To remedy this this, run the following command (manual signing only):
cd /etc/bind/pri
dnssec-signzone -A -3 $(head -c 10 /dev/random | sha256sum | cut -b 1-16) -N INCREMENT -o example.com -t example.com
OR
/var/bind/named.cache:2: signature has expired
To remedy this this, run the following command:
/usr/bin/wget --user=ftp --password=ftp ftp://ftp.rs.internic.net/domain/root.zone -O /var/bind/named.cache
/usr/sbin/rndc reload
CHROOT
If you are security conscious then you can "jail" the named process which if broken into will lock the perp in the chrooted named directories only... as these files are replaced upon restarting bind, it doesn't matter if they are damaged/compromised.
To setup a chroot envirnnment, just do the following.
1) Setup named as above so that everything is working.
2) Uncomment 'CHROOT="/chroot/dns"' in /etc/conf.d/named
3) execute emerge --config net-dns/bind
4) restart named
You should get the following:
* Starting chrooted named ...
* Mounting chroot dirs
* mounting /etc/bind to /chroot/dns/etc/bind
* mounting /var/bind to /chroot/dns/var/bind
* mounting /var/log/named to /chroot/dns/var/log/named                                                                                                                                [ ok ]
DNSSEC
Automagically
In the "options" block of named.conf, make sure the below lines are present.
dnssec-enable yes;
dnssec-validation yes;
key-directory "/var/bind/pri";
inline-signing yes;
Further down where your zones are defined, you should have something like this.
zone "example.com" IN {
type master;
file "pri/example.com";
notify yes;
allow-update { key "rndc-key"; };
inline-signing yes;
auto-dnssec maintain;
};
Restart named and you should see for each zone with inline-signing enabled.
example.com
example.com.jbk
example.com.jnl
example.com.signed
example.com.signed.jnl
The auto signing way seems to be more reliable as using the manual method, named would fail to find the private keys randomly several times per day.
Manually
In /etc/bind/named.conf, ensure the following are present in the options block:
dnssec-enable yes;
dnssec-validation yes;
key-directory "/var/bind/pri";
Next cd to either /var/bind/pri or /etc/bind/pri.
Now we'll create a Zone Signing Key (ZSK):
dnssec-keygen -a RSASHA256 -b 2048 -n ZONE example.com
Note: You need to create telemetry or this will take hours. Start a big emerge or fire up a VM.
Next we'll create a Key Signing Key (KSK)
dnssec-keygen -f KSK -a RSASHA256 -b 2048 -n ZONE example.com
Note: You need to create telemetry or this will take hours. Start a big emerge or fire up a VM.
You should have 1 pair of KSK and ZSK files.
Kexample.com.+008+00712.key
Kexample.com.+008+00712.private
Kexample.com.+008+12951.key
Kexample.com.+008+12951.private
Now add the key files to the bottom of the zone file. eg
$INCLUDE Kexample.com.+008+00712.key
$INCLUDE Kexample.com.+008+12951.key
Now we need to sign the zone file:
dnssec-signzone -A -3 $(head -c 10 /dev/random | sha256sum | cut -b 1-16) -N INCREMENT -o example.com -t example.com
This creates a new file named example.com.zone.signed which contains RRSIG records for each DNS record. We have to tell BIND to load this "signed" zone.
Open the bind config file /etc/bind/named.conf and add the signed file to the zone block. eg
zone "example.com" IN {
        type master;
        file "pri/example.com.signed";
        notify yes;
        allow-update { key "rndc-key"; };
        inline-signing yes;
};
That's it. Reload/restart bind and you should be golden ;)
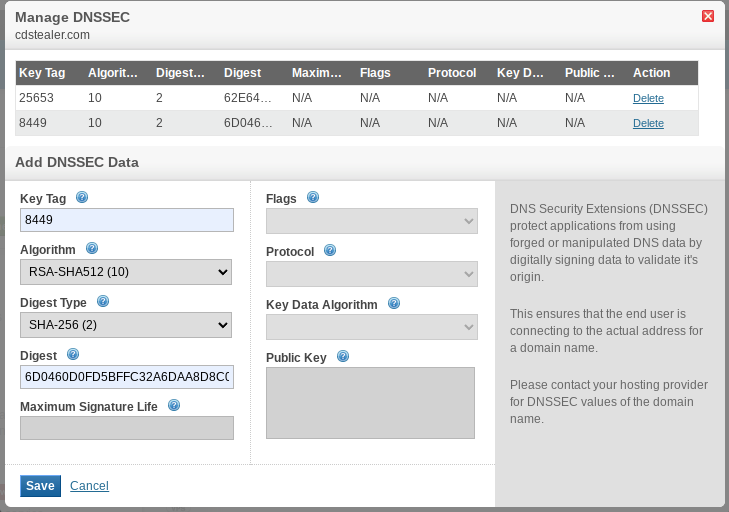
If you're using a 3rd party DNS, you will need to add the DS and DNSSEC public keys.
There should be a dsset-example.com file within /var/bind/pri, cat this and you will see:
example.com. IN DS 8449 10 2 817AC0B85419C947608AAF54ED52F137137DA157F3B86C1B08509495 5E917C14
You may have several .key files, if you need to add another DS record, you can run the command:
dnssec-dsfromkey <Kexmaple.com....key>
Add the output to the dsset-example.com file and also the external nameserver provider.

Note: Remove the space from the Digest key.
We would also need to add the corresponding DNSSEC public key. To do this, we need to cat the contents:
# cat /var/bind/keys/Kexample.com.+010+08449.key
; This is a key-signing key, keyid 8449, for example.com.
; Created: 20151115172130 (Mon Nov 15 17:21:30 2015)
; Publish: 20151115172130 (Mon Nov 15 17:21:30 2015)
; Activate: 20151115172130 (Mon Nov 15 17:21:30 2015)
example.com. IN DNSKEY 257 3 10 AwEAAdi4syP6xRyXjjGngSvFn51GR85AvWSqUCyST9CM6tJWEiRwEpTJ ....
Unfortunately this was unavailable with the provider I was with.
Testing
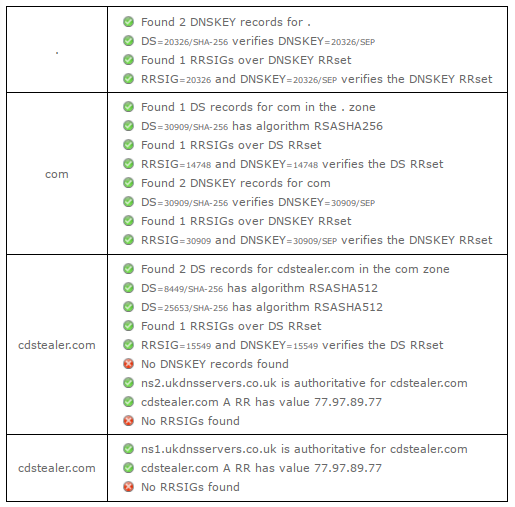
To varify that DNSSEC is used by the 3rd party nameservers, you can use this tool: https://dnssec-analyzer.verisignlabs.com/

You can also test your internal DNS by executing:
named-checkzone -D -f raw -o - example.com example.com.signed
This will output the encryption for each entry in the zone file.
# named-checkzone -D -f raw -o - cdstealer.com cdstealer.com.signed
zone cdstealer.com/IN: loaded serial 201421440 (DNSSEC signed)...
How to setup a DHCP that will update the dns records of bind.
DHCP /etc/dhcp/dhcp.conf
Then add the following to the top of /etc/conf/named
OPTIONS="-4"
ENABLE_ZONE_WRITE=yes
Now restart named & dhcpd. If you get any errors, check /var/log/messages and double check your work.


